Facebook Pixel: Install, Optimize and Boost Your Facebook Campaigns

If you’re advertising on Facebook (which you should be) and you’re not using a Facebook pixel (which you also definitely should be), then this article is about to change your life.
The Facebook pixel is one of the most powerful tools you can have in your marketing arsenal. No matter what industry you’re in, a Facebook Pixel has the power to increase website traffic, generate more leads, and ultimately get more sales.
It goes without saying, if you’re already spending good money on your Facebook campaign, you’re missing out if you are not taking advantage of all the opportunities that that this tool has to offer.
We know that installing a pixel on your website’s code might sound super scary and techie. Believe us, we’re not fans of that stuff either but it’s worth it. So worth it that we put together this A-Z guide that walks you through each and every step of setting up a pixel and teaches you how to make it work for you.
Let’s get started!
What is a Facebook pixel?
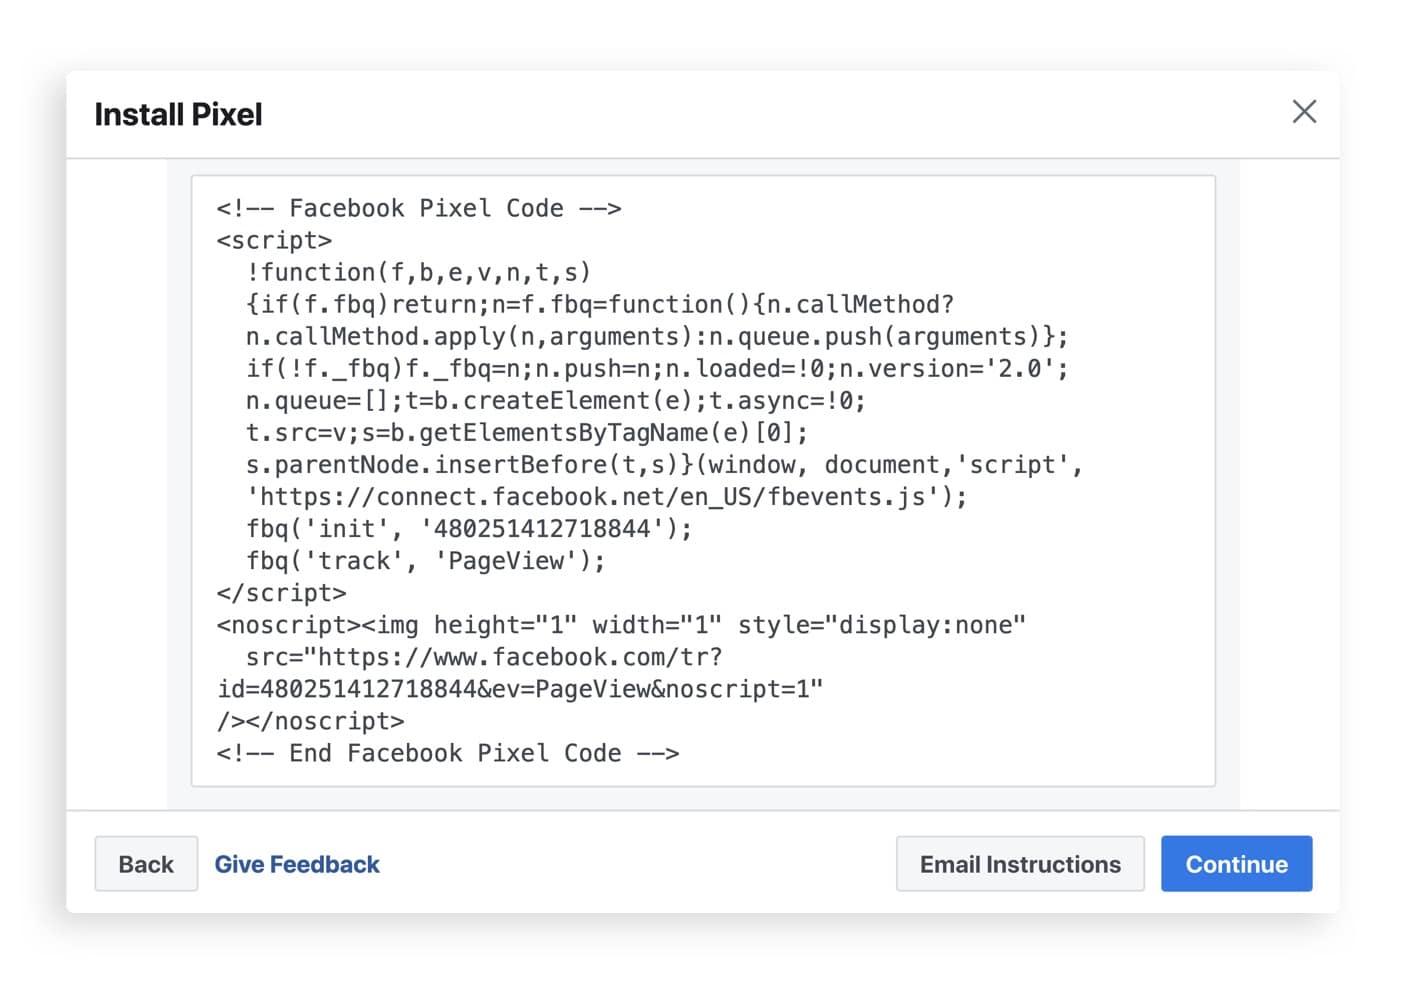
The Facebook pixel is a piece of code that you place on your website. The pixel’s job is to collect the data and track conversions from your Facebook ads. It’s also important to note that as Instagram ads are also managed through the Facebook Business Manager, the pixel also tracks the activity from your Instagram advertising efforts.
To put a face to the name, this is what the pixel code looks like:
What is a tracking pixel and how does it work?
Basically, it is an analytics tool that measures and tracks your Facebook advertising efforts and ultimately shows you how to optimize your ads, target the right customers, and get more for your money.
When someone visits your website and takes an action, the Facebook pixel is triggered and reports this action. This way, you can track your Facebook ad’s impact, follow your customers’ activity, and retarget them or customers like them.
What data does the Facebook pixel collect?
This tracking pixel creates a flow of information between your website and Facebook ads. Facebook has a number of standard events that you can track on your website:
- Views – Visitors who land on your website.
- Search –Visitors who used the search bar on your site.
- Add to cart – Visitors who added a product to their cart.
- Add to wishlist – Visitors who added a product to their cart.
- Customize a product – Visitors who chose a certain version of your product.
- Initiated checkout – Visitors who started the checkout process.
- Add payment info – Visitors who started the checkout process and added their payment info.
- Made a purchase – Visitors who completed a purchase.
- Start trial – Visitors who started a free trial.
- Scheduled an appointment – Visitors who booked an appointment.
Customize your pixel
You can even customize your standard events by using extra snippets of code that are called parameters. They allow you to organize your event based on worth, content type, ID, product, and more. You can also create a completely original custom parameter by using specific URLs, which you can learn more about here.
How do I create a Facebook pixel?
Now, you know that the pixel can take your Facebook campaigns to a new level, but you still might be hesitant to move forward. We’re here to tell you that it’s much easier than you think and to prove it, we will walk you through every single step of the setup.
![]()
Step 1: Generate your unique pixel.
Every pixel has its own 15 digit ID that you need to integrate on every web page that you want to track.
You can easily generate a pixel ID either from your Ads Manager or through your Business Manager. Keep in mind that if you want to create more than one pixel for your account, you’ll need to do so through your Business Manager.
Ads Manager Option
Click on the hamburger button on your events manager dashboard and select “Pixels.”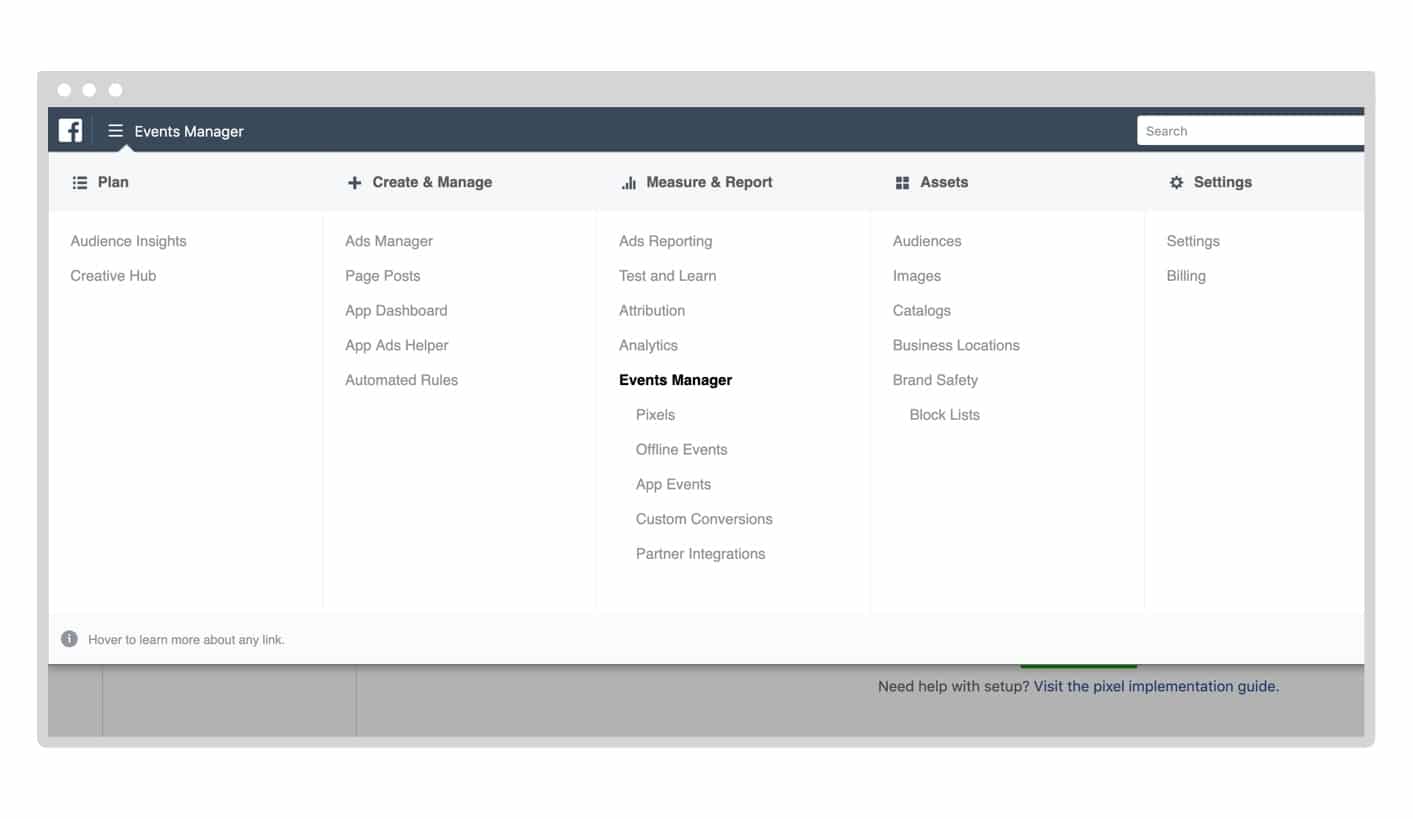
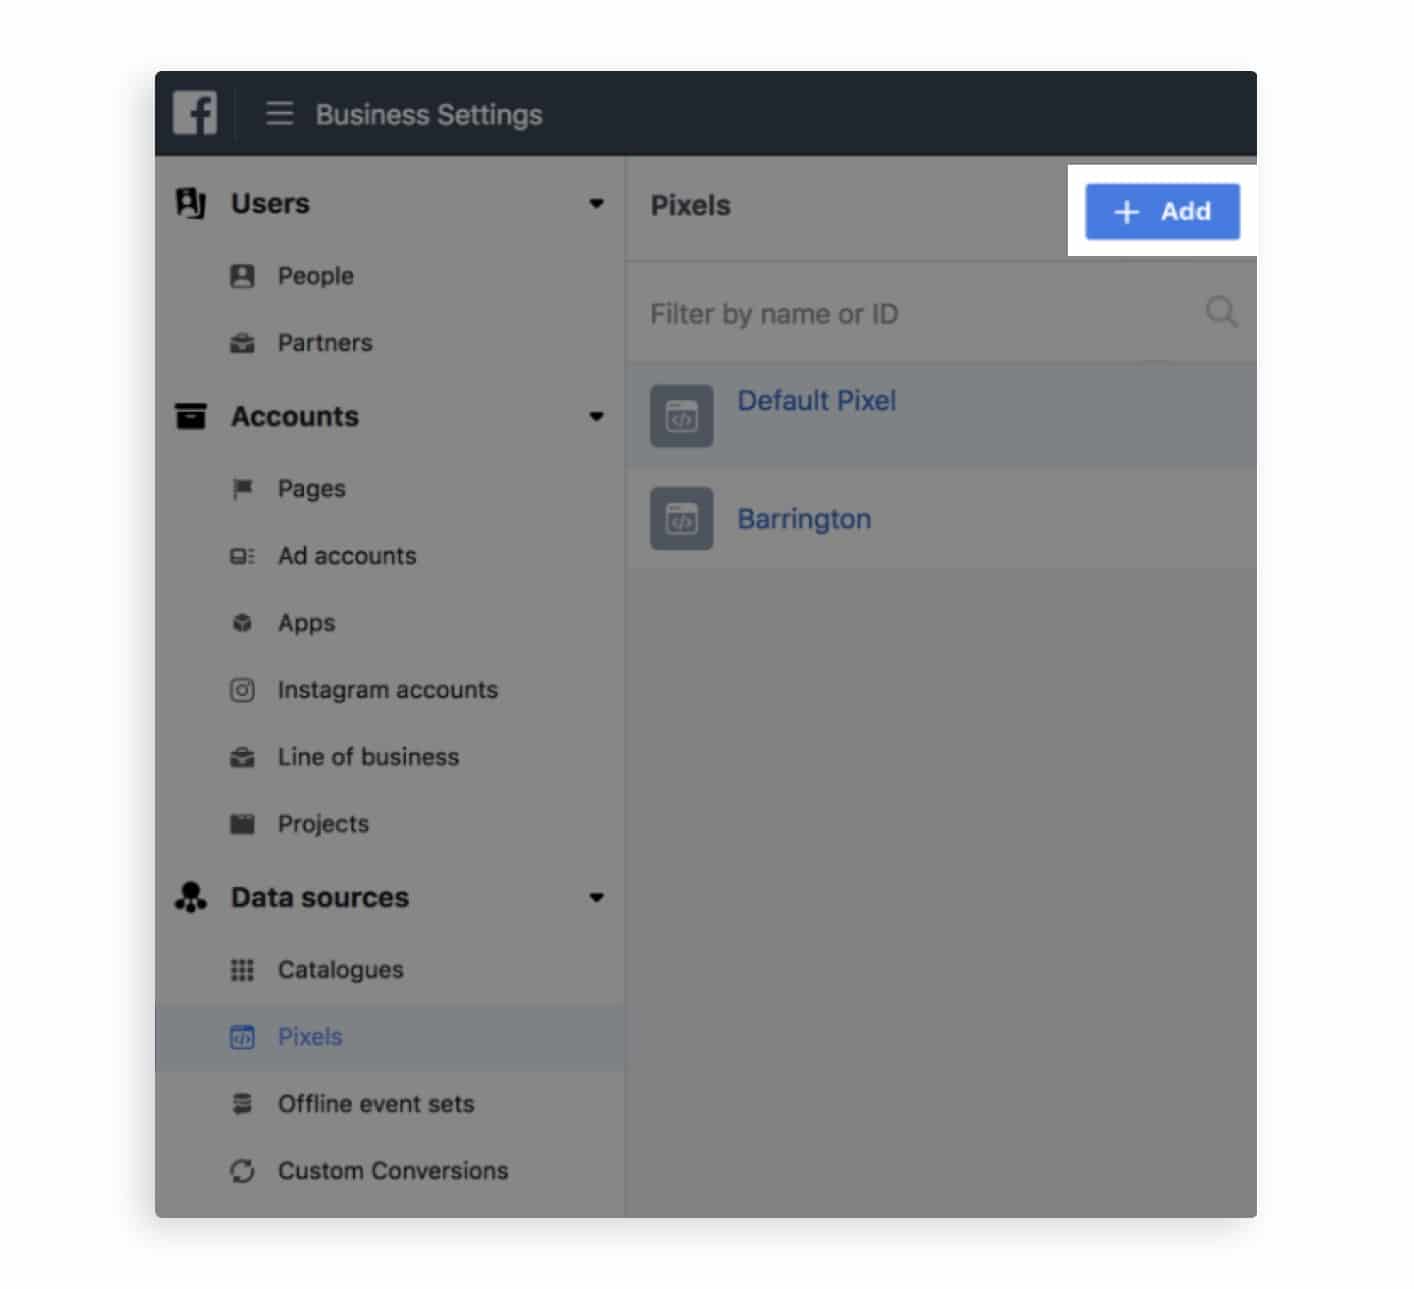
Business Manager Option
Click on the Pixels icon the left-hand menu and then click on the blue “Add” button.
 Step 2: Create a pixel.
Click on the green “Create a Pixel.”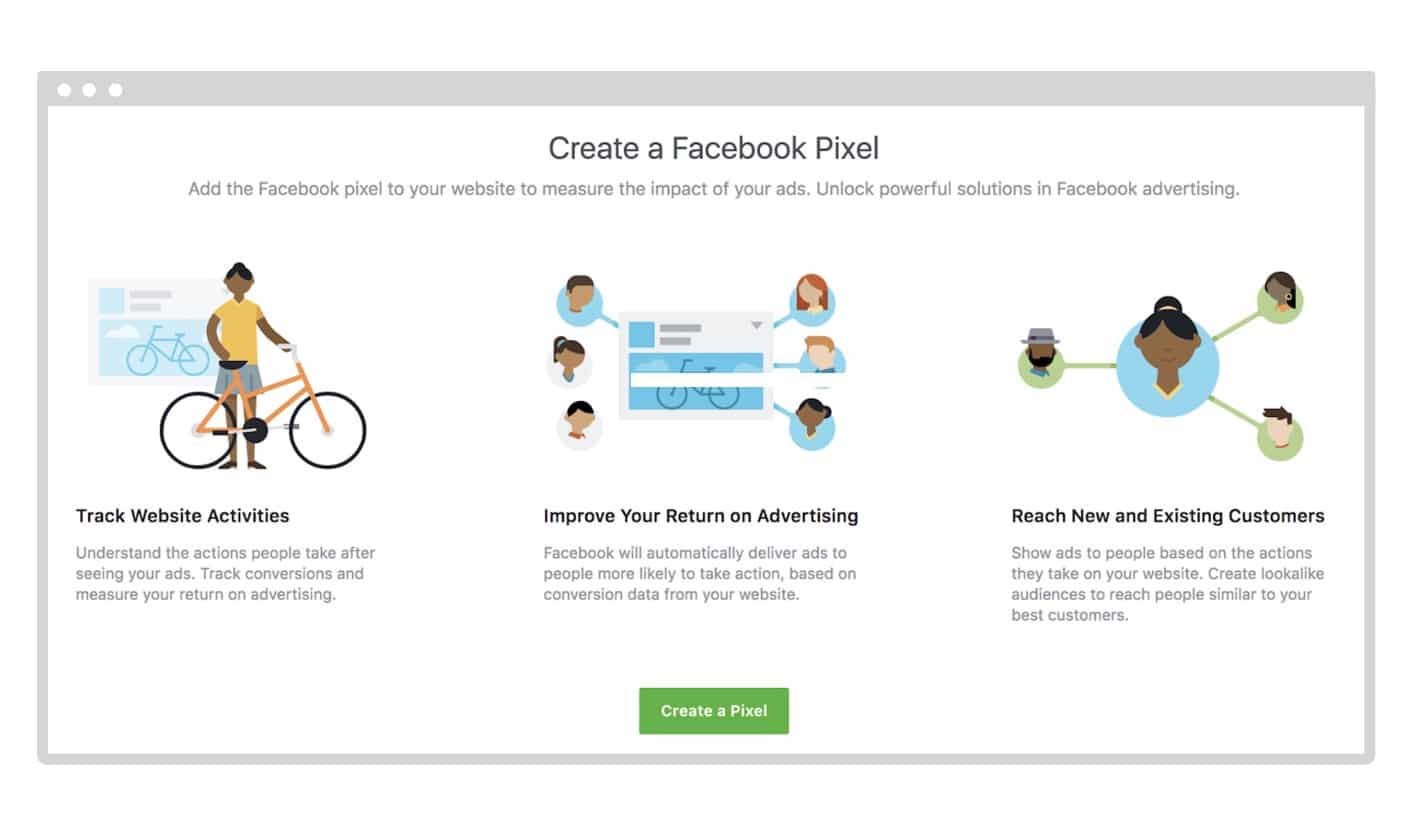
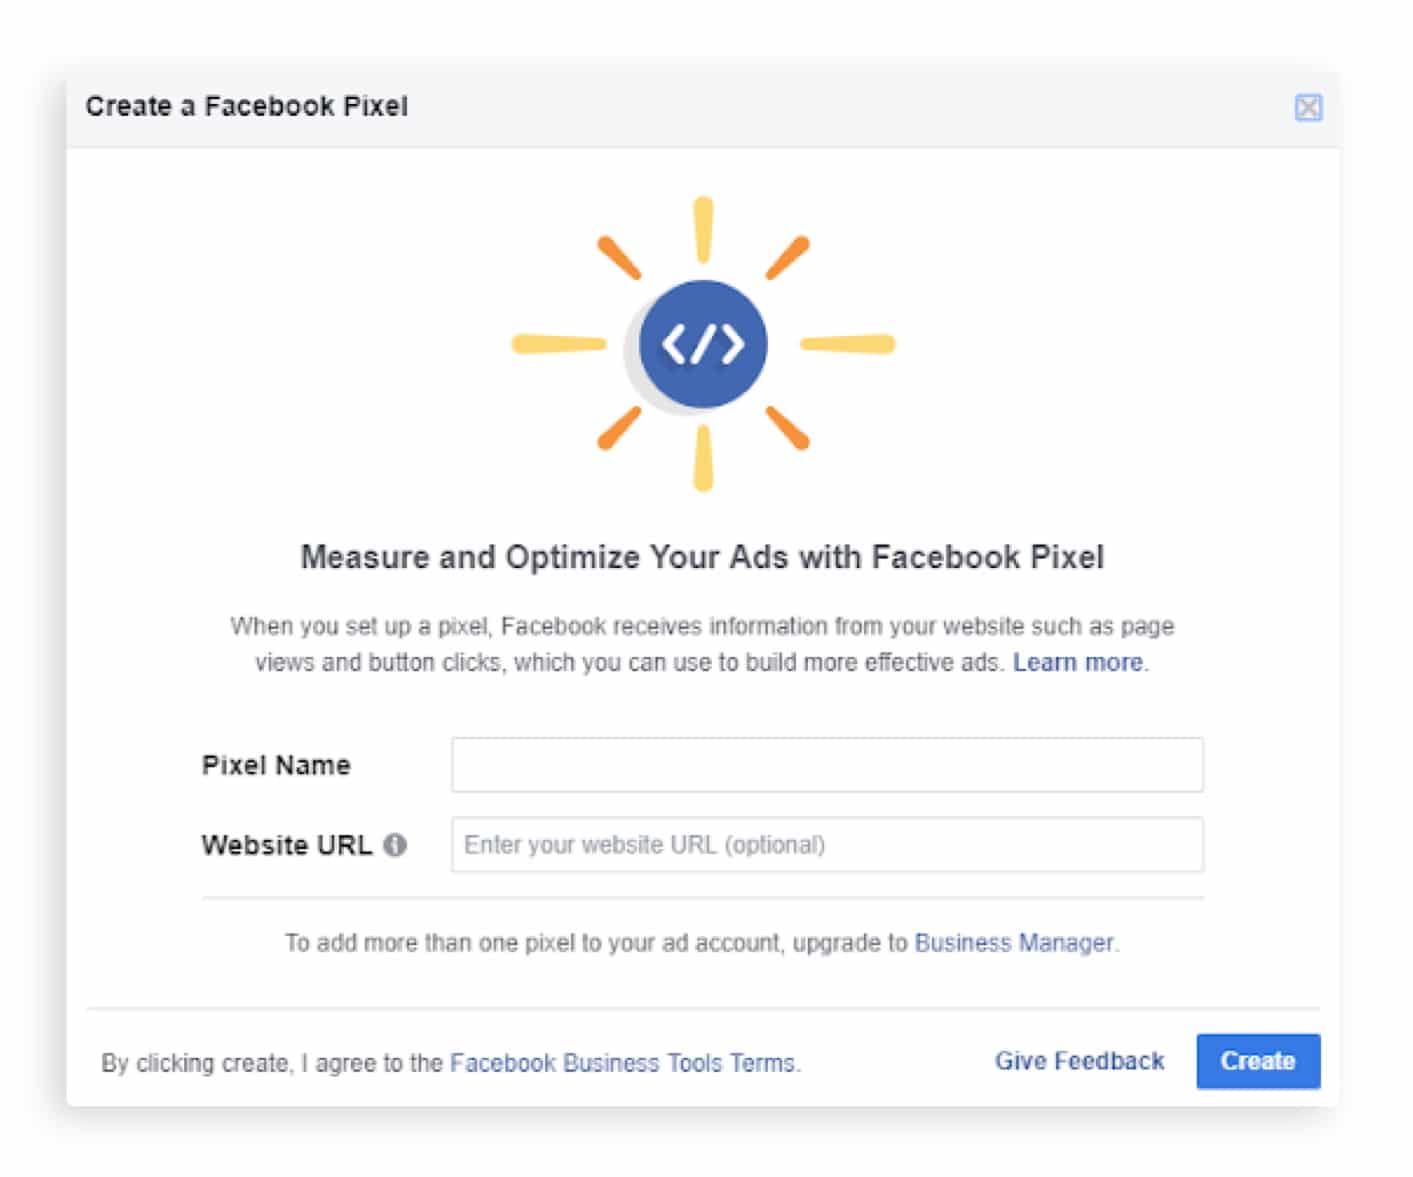
Step 3: Name your pixel.
Name your pixel, input your website URL, and click create.
Step 4: Choose an installation option.
Once you generate your pixel, you’ll be offered a few installation options.
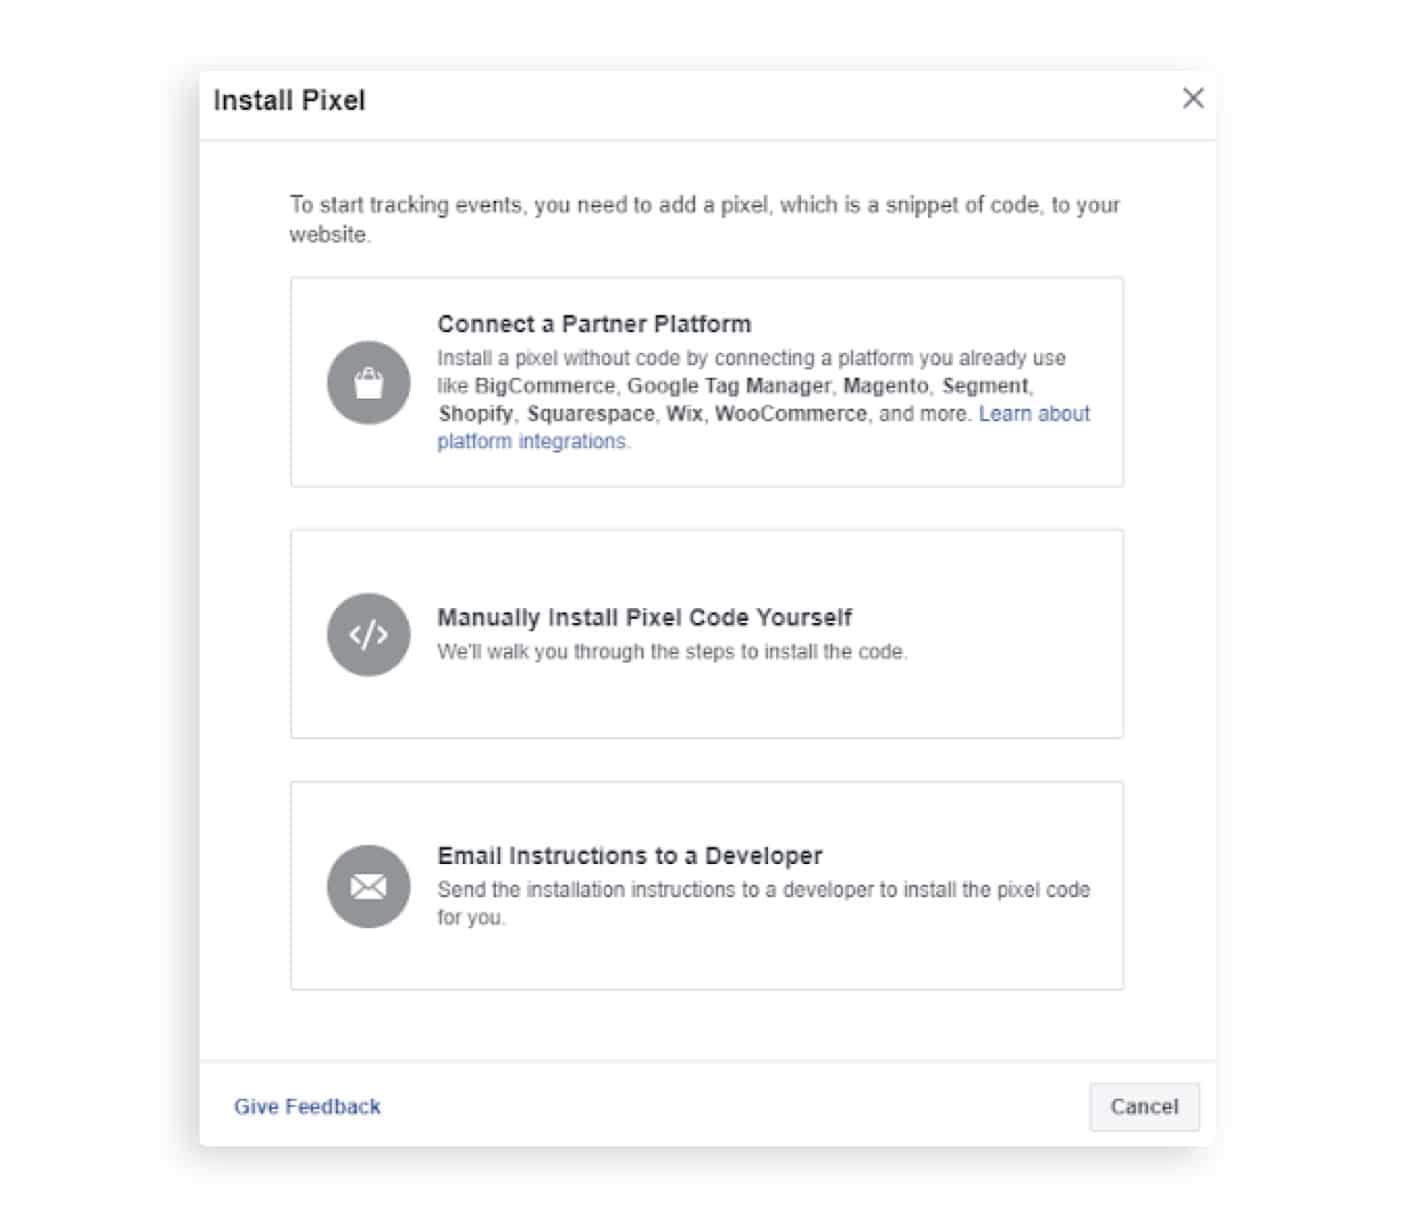
1. Use Integration or a Tag manager – If your website is on an e-commerce platform like Wix, Squarespace or Shopify, you’ll be able to install the pixel without any sort of coding. Among the most popular of these platforms (click for installation instructions):
- WordPress
- Shopify
- Wix
- Squarespace
- Instapage
- Unbounce
- You can find all other integration platforms here
2. Manually Install the Code Yourself – this is the hardest option (but totally doable). First, copy the pixel and paste it in your website’s header code (between the <head> tag and </head> tag). Remember that you need to paste it on every page you want to track. Most developers add it to their website’s persistent header, so it can be used on all pages.
3. Email Instructions to a Developer – If you have a developer, great! It’s someone else’s problem now :).
Step 5: Doublecheck that the code was installed properly.
Input your website URL and click “Send Test Traffic” to see if your pixel is tracking activity. Below we will discuss how you can use the Facebook Pixel Helper to track your pixel on every page.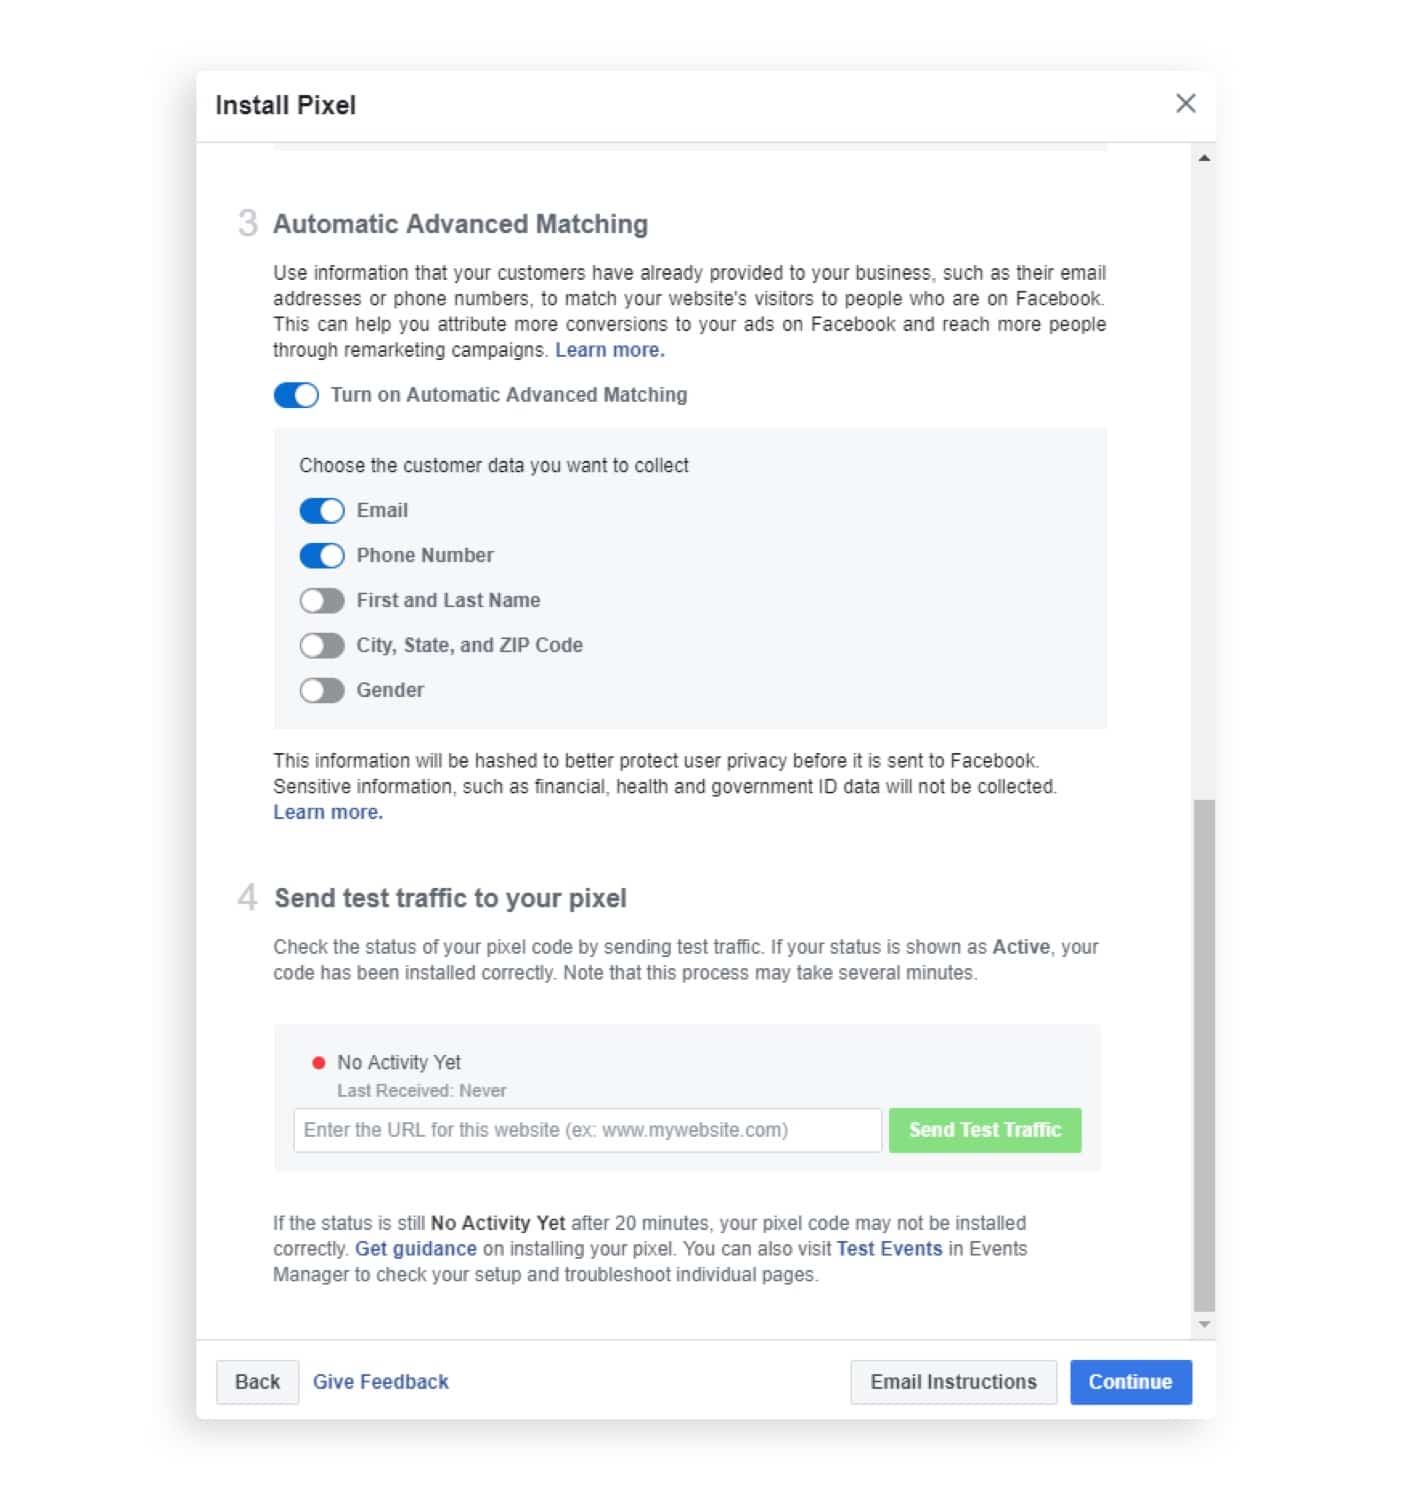
Step 6: Define the valuable actions that you want to set up as events.
There are two ways to complete this step. You can either use “Facebook’s Event Setup Tool” to select events directly on your website or you can manually install the event code for each event you want to track. If you choose to go with the “Facebook’s Event Setup Tool,” you’ll need to input your website’s URL.
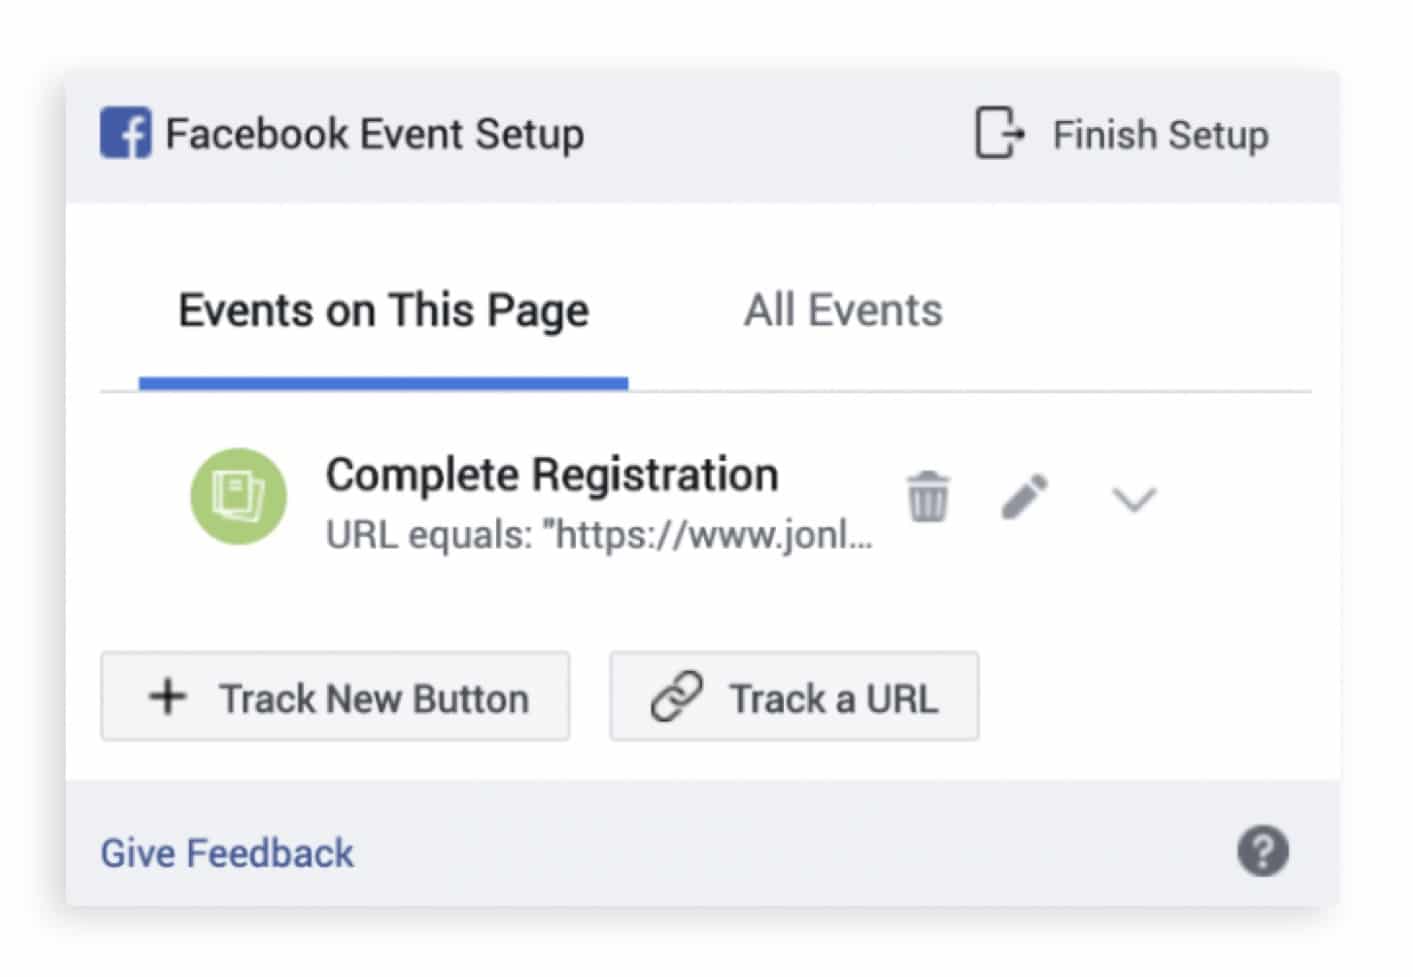
 Once you put in your website URL, you’ll reach a page in which you’ll be asked to select an event and the URL of the page that the user will have to visit in order for it to be triggered.
If you select “URL Equals” it means that the event will only include that single URL, but if you select “URL contains,” the event could include multiple URLs.
If you want to add the code to the different pages of your websites, click “Manually Install the Code Yourself” and select the events that you would like to track.

You’ll see that for each event you have two options: “Track Event on Page Load” or “Track Event on Inline Action.”
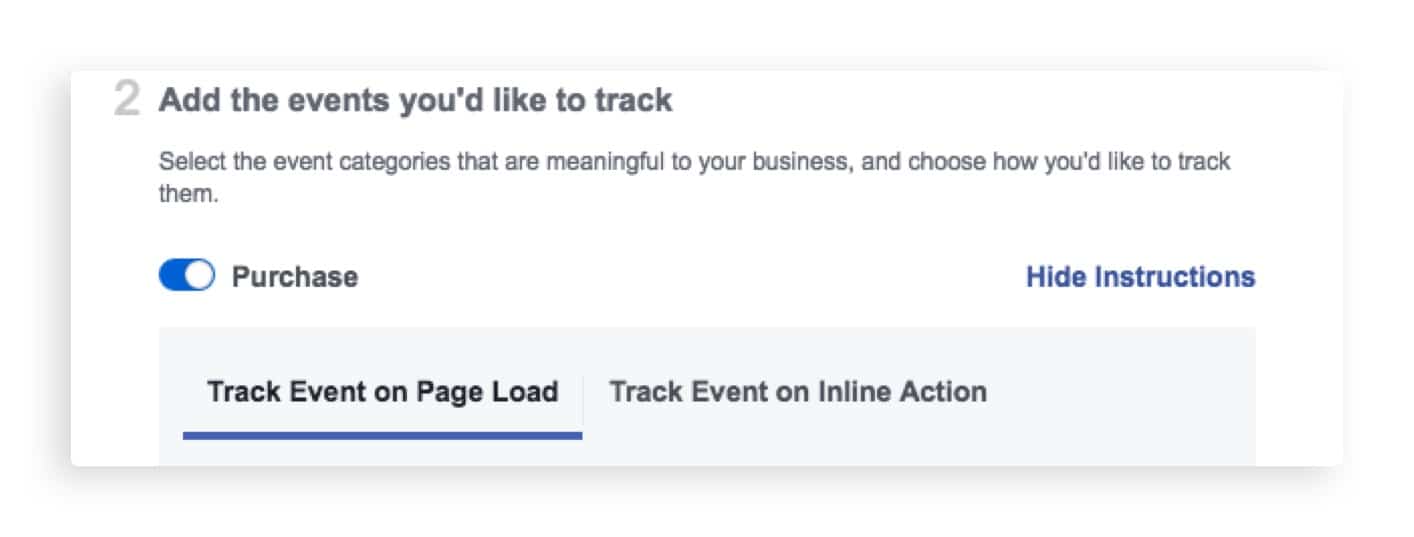
If you select “Page Load” then the event will be triggered just by landing on a certain page, but if you select “Inline Action” then the event will only be triggered when someone clicks on a specific call-to-action.
If you want to create custom events that do not appear in the current options, click “Create Custom Conversion” on the top right of Events Manager and create custom events via URL.
You also have the option of selecting, “Track New Button” which will allow you to track clicks instead of just visits.
How do I check if the pixel is tracking events?
Okay, we know that you installed the pixel correctly because you sent test traffic, but now we have to make sure that it is also tracking everything you need. To check that this process is running smoothly, the Facebook Pixel Helper is an excellent option.
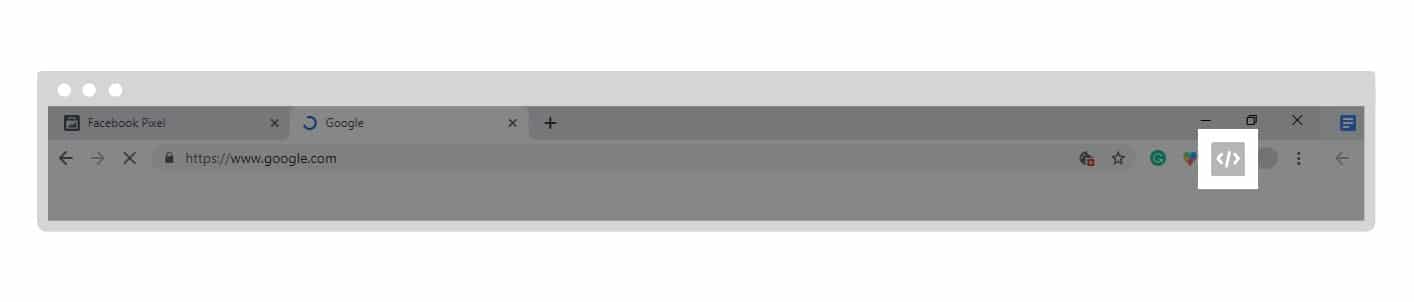
Facebook Pixel Helper – Add this extension to your Google Chrome browser. If you don’t use Chrome, we strongly suggest you install it, if just to check that your pixel is tracking all of your events. It is a super helpful troubleshooting tool that provides feedback in real-time
After you install the Pixel Helper, a small icon will appear on your toolbar that will alert you whenever you land on a website with an installed pixel. Every time you land on (any) website, it will show if there is a pixel installed, which events were triggered, and if the pixel is working properly.
Don’t forget to add a pixel notice to your website!
When you use a Facebook pixel on your site, you need to comply with their terms and conditions by notifying all of your visitors that you are collecting their data. Don’t forget to add a clear notice that will alert your visitors that you are using a Facebook pixel to collect their data and let them know that they can opt out.
Your pixel is ready – Good job!
Before you dive further down the rabbit hole that is the Facebook pixel, now is the time to take a breath and pat yourself on the back. The job is not done but the hard part is certainly over. Now we just look at the data, improve, tweak and improve some more.
How to access your Facebook pixel data
This will obviously be the first thing that you’ll do after you install your pixel. Bear in mind that once you install your pixel, it will only then start collecting data so you’ll have to wait at least 14 days to have enough data to show a pattern.
To access the data, you need to return to the Pixel page in your Ads Manager. First, you’ll see a graph that outlines the number of times your pixel has been fired off in that time period.
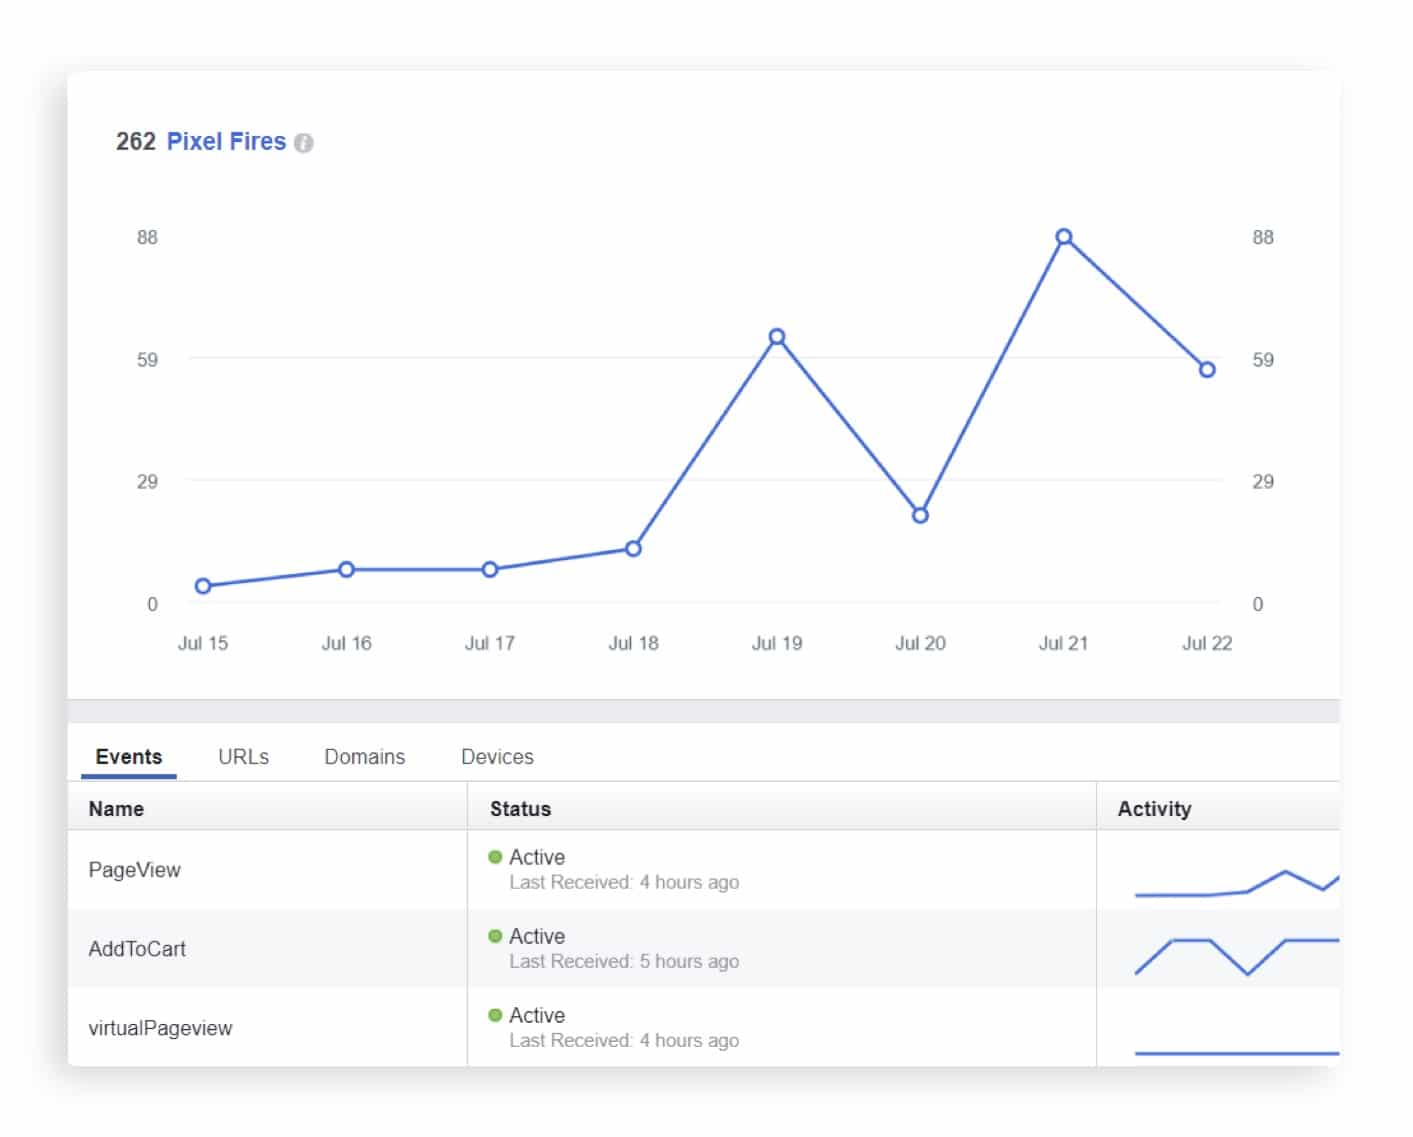 You might see a few different lines in a few colors. Each line represents a different kind of event, such as visits, conversion, and clicks (but only if you defined these as separate events). Below the graph, you can see four tabs that will each help you analyze the data you collected from a different perspective. Let’s take a look:
- Events: This tab allows you to view the status and activity of all the events you defined when setting up the pixel.
- URLs: This tab shows you from which URLs the pixel is firing (including your third-party URLs). This data is important because it shows you which of your pages are succeeding more than others.
- Domains: This tab is only helpful if you’ve installed your pixel in more than one website.
- Devices: This tab will let you know which devices your visitors are using to view your site and help you gauge how to optimize your ads.
What next?
Is it enough to put the pixel on the website to collect visitors and count conversions? The short answer is no.
It’s important to understand that the pixel doesn’t actually make anything happen.
We know what you’re thinking. What?! Then why did we go through this soul-sucking process in the first place?!
First of all, keep your pants on. Second, the Facebook pixel is a powerful and necessary tracking tool, but essentially that’s all it does – it tracks. How you optimize your ads with the data you collect is what will ultimately make an impact and that’s exactly what we are going to cover next.
Improve your target audience with your Facebook pixel
The real power of the pixel is that it allows to get to know your audience and their habits and in turn, give them what they want (which ultimately leads to getting what you want). Let’s see how we can take advantage of all that the pixel has to offer.
Once your pixel is in place, return to the Ads Manager and click on the hamburger icon. Select “Audiences” and then “Create a Custom Audience”.
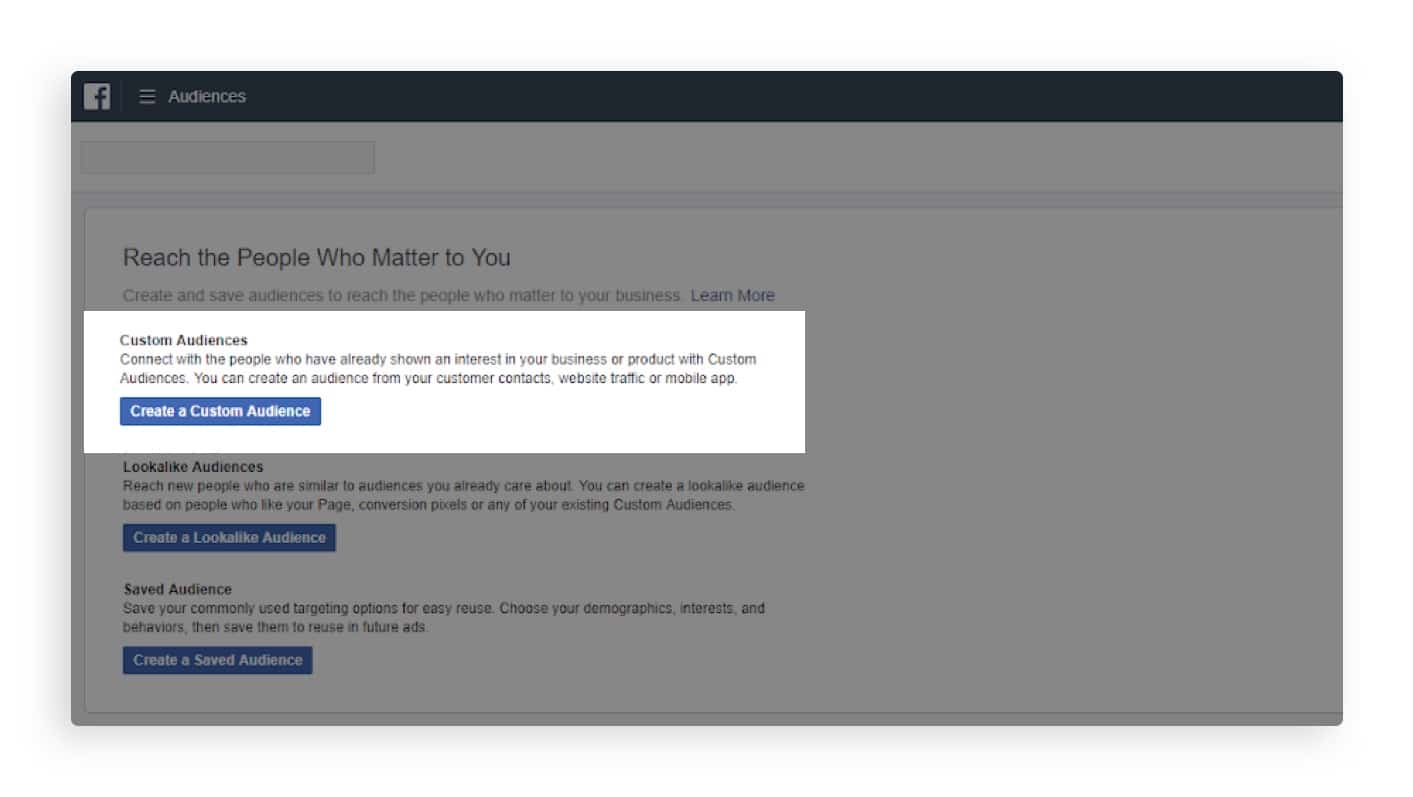
Once you reach this screen, select “Website traffic” as your source.
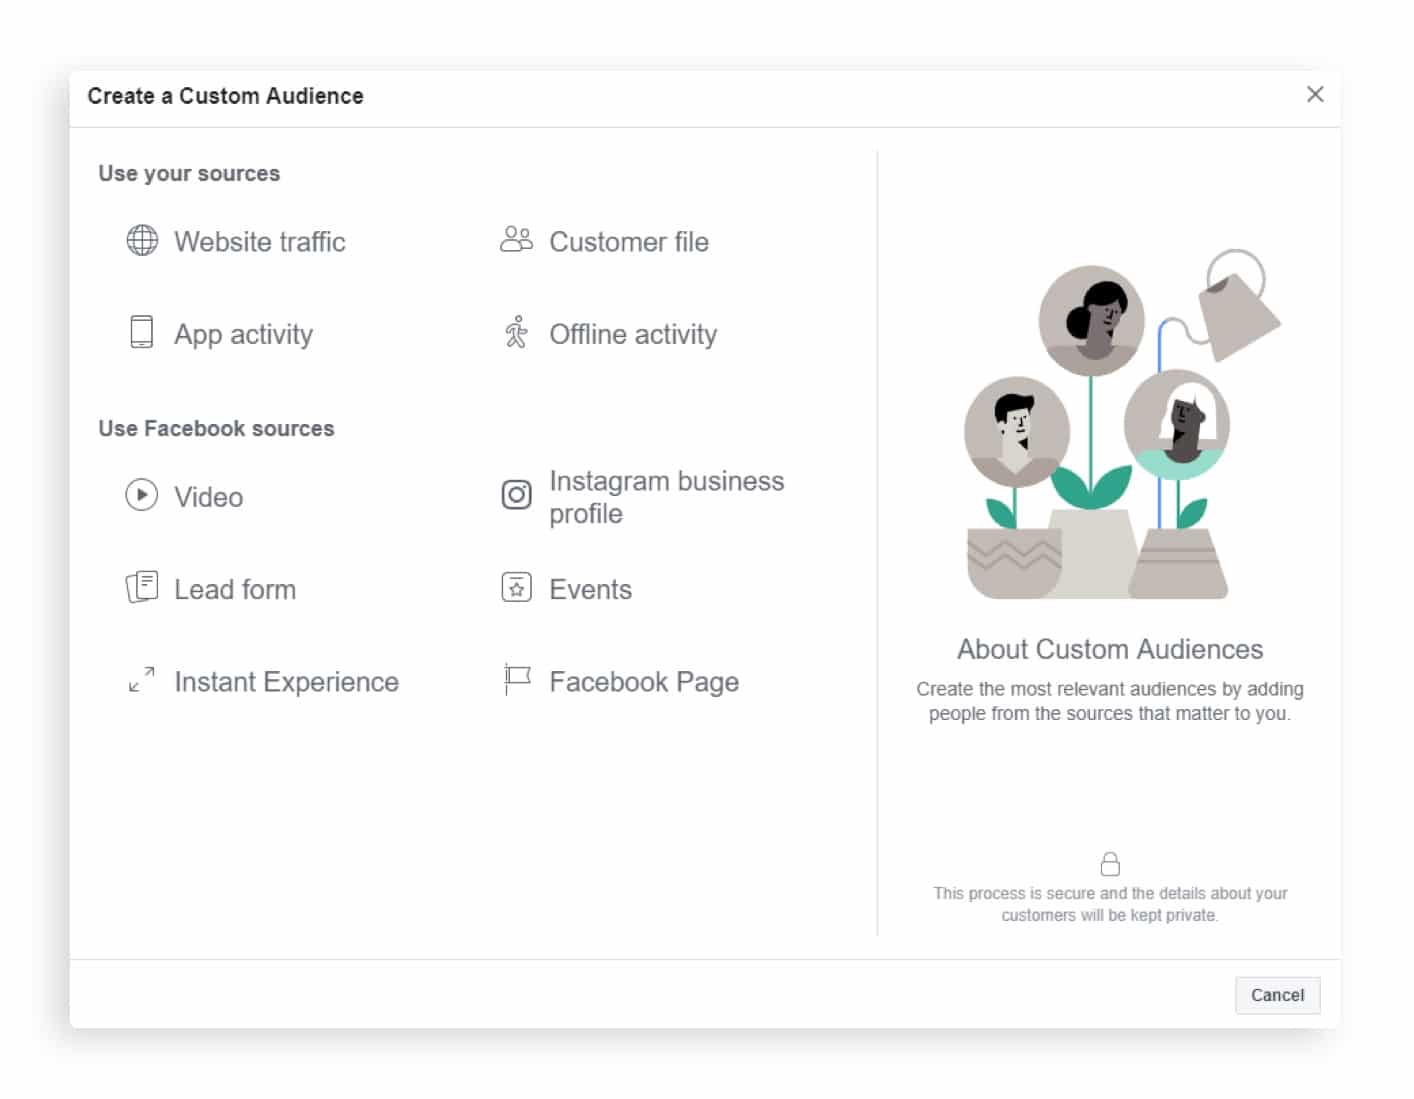
Now you’ll be able to target people based on their interaction with your website.
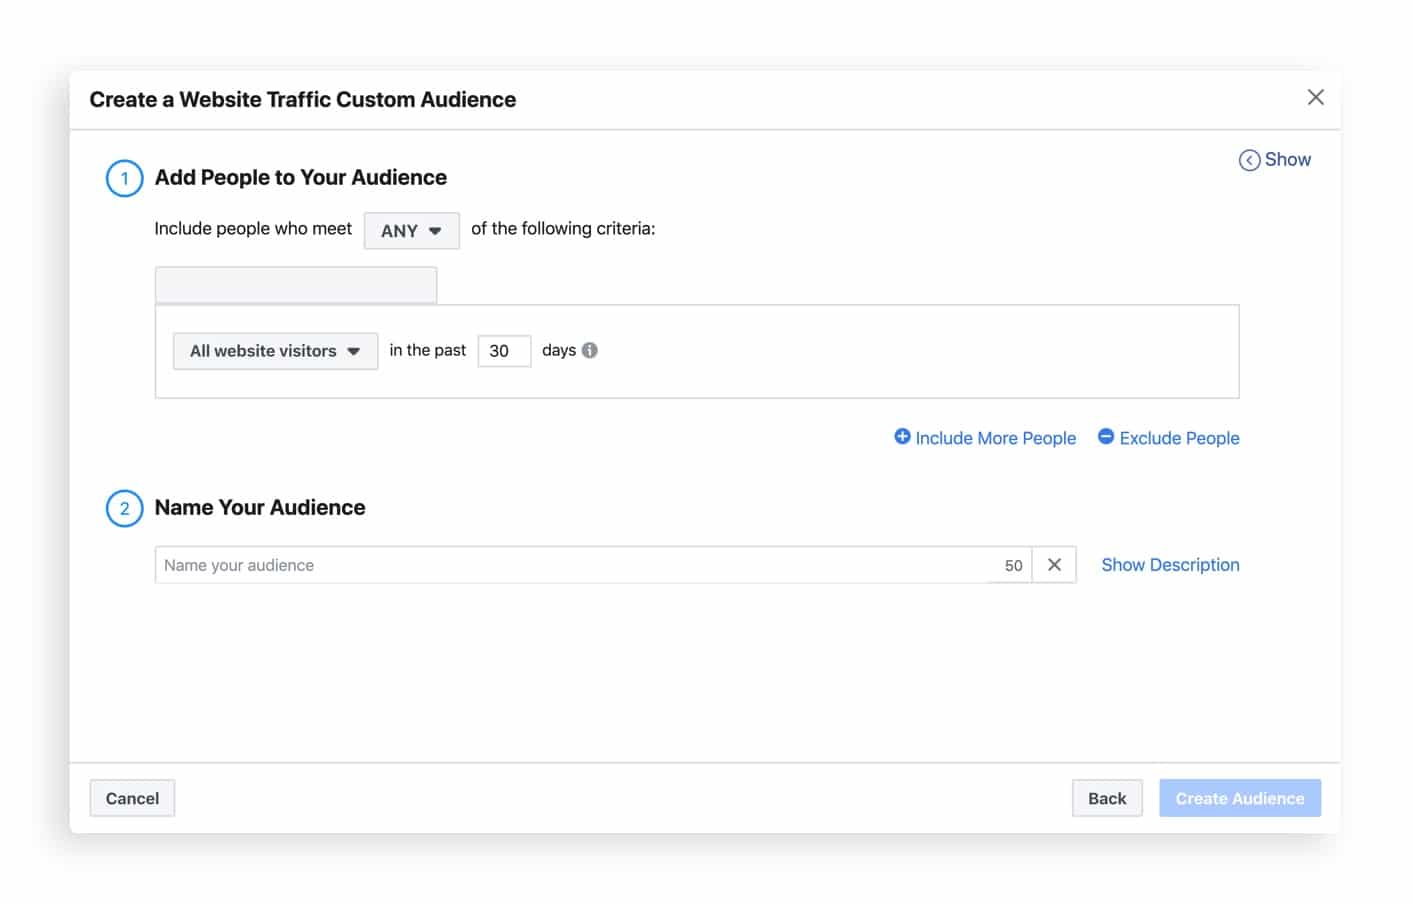
For example, you can create an audience named, “All Visitors–30 Days Back.” To do this, choose the value, “All website visitors,” or “People who visited a specific web page” from the drop-down box found here:
Retarget your visitors with your Facebook pixel
One of the really cool things that you can do with the Facebook pixel is to retarget people who have already visited your site. If you have a large catalog of products, you can also use dynamic ads. You can even show your visitors the exact item they left in the shopping cart or added to their wishlist.
As an example let’s see how to retarget users who left an abandoned cart.
First, you’ll select “People who visited a specific web page” and then you’ll have to mark all users who have visited both the page containing “Item A” and the “Checkout page”.
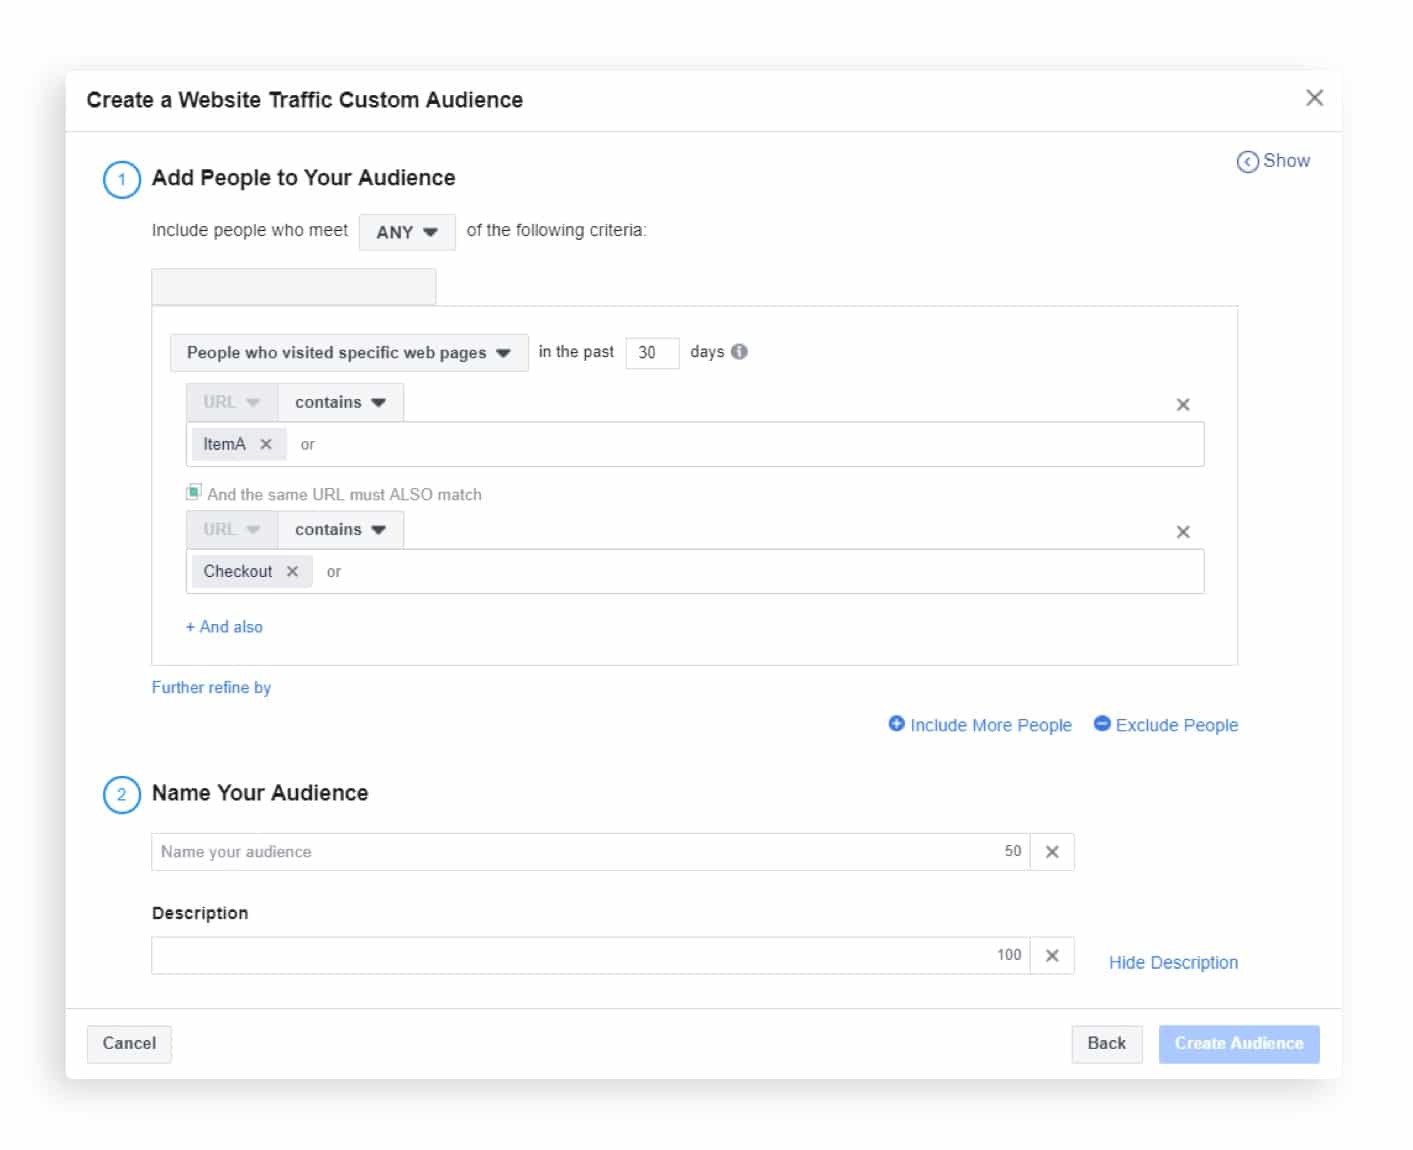 Make sure that you include all of the parameters (visits or clicks) that you want to target. Also, it’s very important that you exclude customers who already made that purchase so you don’t waste money or annoy customers. To do so, simply select “Exclude People”and remove anyone who visited your thank you page.
Don’t forget to give this audience an intuitive name so that you can easily retarget it in the future.
Now that you’ve set up this audience you can shoot some targeted ads their way. You can target them with an ad that includes items similar to the ones they viewed or with the exact items that they left in their shopping cart. The options are endless.
Create a lookalike audience with your Facebook pixel
A lookalike audience is another great tool that you can now take advantage of, thanks to your newly installed Facebook pixel.
Lookalike audiences are a Facebook segmentation tool that allows you to target a user demographic who share interests with your current followers. It’s important to note that your source audience must contain at least 100 people from the same country.
The advantage that a lookalike audience has over a regular custom audience that you create yourself, is that Facebook algorithm combs through all of the data of your user database, and target a very similar audience that you were not able to reach beforehand.
To create a lookalike audience, click on the “Audiences” tab in the Ads Manager.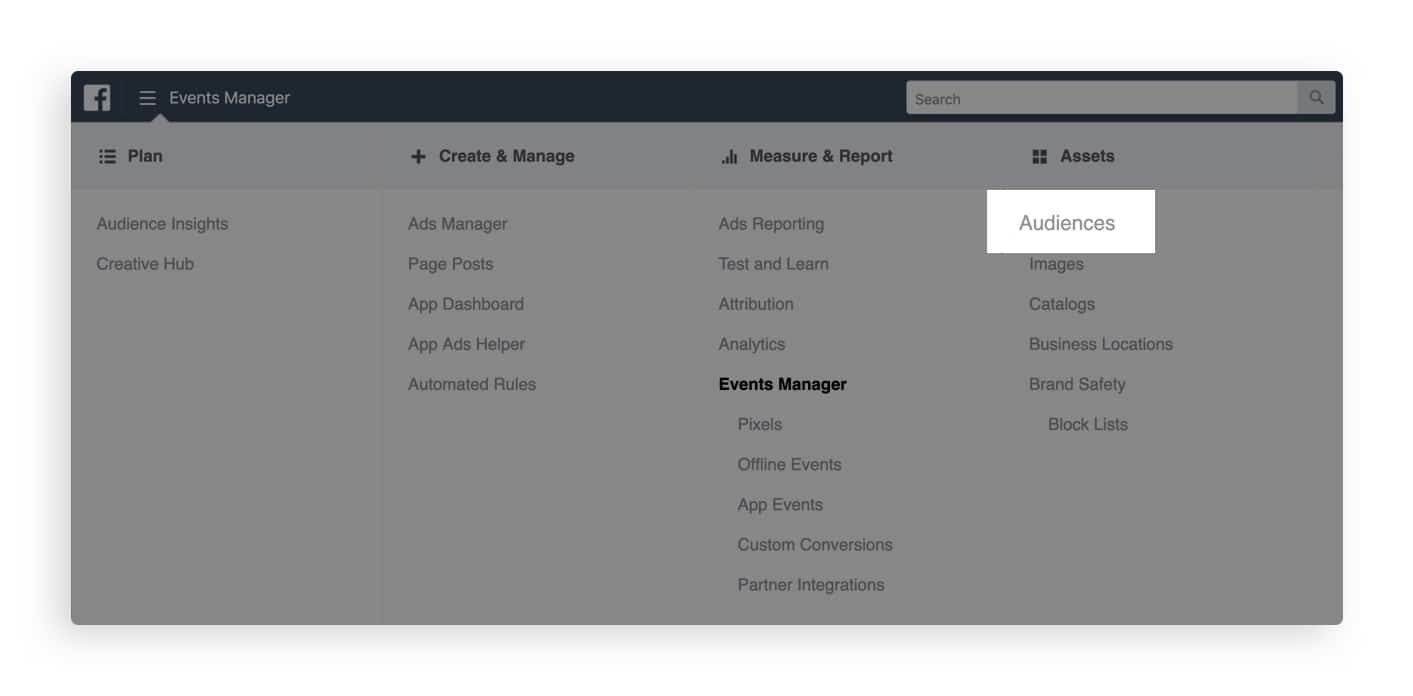
The click on the drop-down bar and select “Create a Lookalike Audience”. 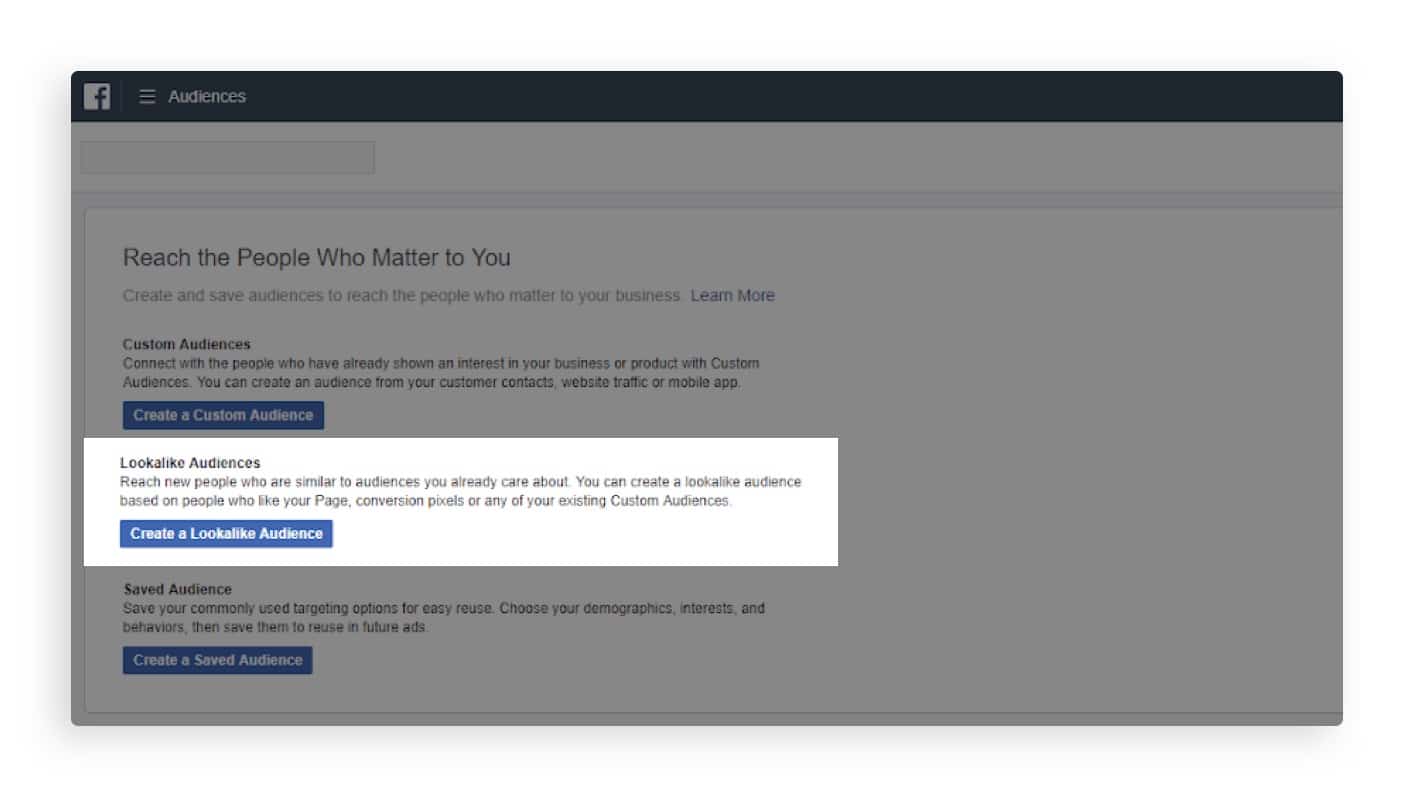
After that, you’ll be asked to ask to select a source. This is the source of the data you will use to create your lookalike audience. You probably want an audience with interests similar to that of visitors who have reached your website, so the best option is to choose “website traffic” as your source.
You’ll then be asked to determine the location and size of your audience. Location is pretty intuitive, you simply choose the audience that makes the most sense for your business. Size, on the other hand, is not an actual number of people. It narrows down the size of your audience to the closest matches. 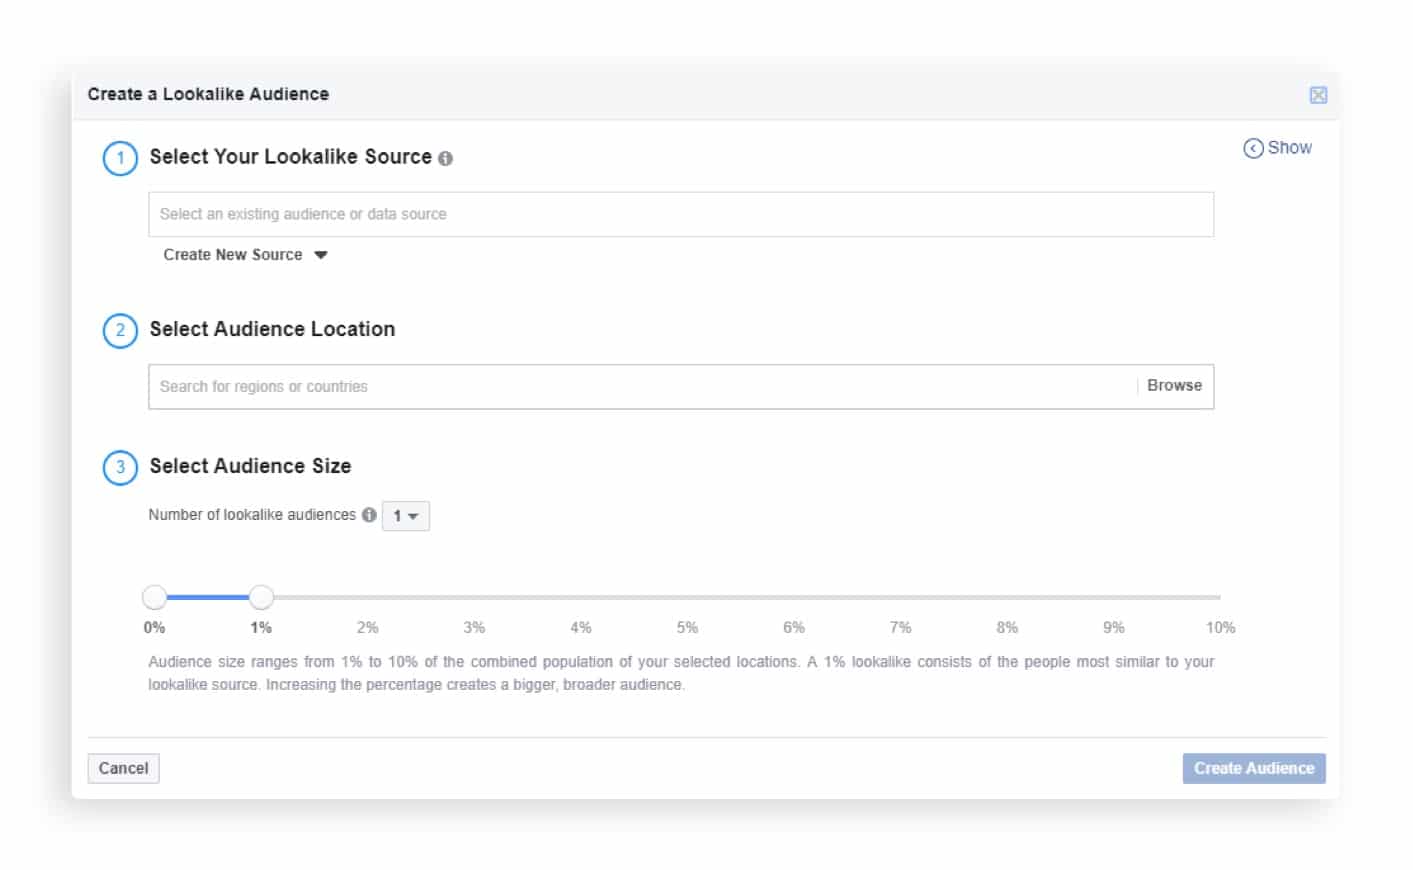
When you are done, simply click on the blue “Create Audience” button and you’ll see the audience name listed when you create a new campaign.
Optimize your ad for conversions with your Facebook pixel
Your Facebook pixel also allows you to bid specifically for conversion events. Once Facebook collects enough data, they will only show your ad to people who are likely to become customers by buying something on your website.
If you have less than 500 events on your website a month, Facebook recommends that you build up your customer base before you start using conversion optimization.
To optimize for conversion you’ll need to return to the Ads Manager and select the Conversions Objective when building your ad campaign. Within the conversions section, select the Facebook pixel that you installed and the conversion events you want Facebook to set as a goal.
On the ad set level, set the ‘Optimization for Ad Delivery’ field to ‘Conversions’ and we recommend that you set the conversion window for a 7-day period, because users will often look around before they decide to make a purchase.
After setting your targets, schedules, and placements, you’ll then tell the system how much you are willing to pay per conversion. Now armed with all the important information and budget, the system it will do its best to show the ad(s) to people who are most likely to perform this conversion inside the defined bid options you set.
With great power, comes great results
These were just a few ways you can wield the power of the pixel. This tool will help you better define your audiences, use your budget more effectively, and create video ads that get amazing results.
The only thing left to do is to start creating killer videos with Promo.com to boost your Facebook campaigns to a whole new level.
[banner id=11501]


